Motivation for using Ray Marching
The “Graphics Programming” course at the IT University Copenhagen required us to implement a project related to the course material. I chose to focus on Ray Marching for my final project due to multiple reasons.
Firstly, videos showcasing the creation of various 3D shapes through mathematical equations have always fascinated me. Additionally, my interest in procedural generation led me to experiment with generating landscapes in a personal project. Many examples of procedurally generated objects that use ray marching are typically abstract and create endless worlds. My goal was to develop an adaptable ray marching effect that could potentially find use in future projects.
Project Descritpion
I categorized this project into two main parts based on the contained effect. The initial part of the project draws inspiration from the curved world effect found in various video games. My first encounter of this effect was in Animal Crossing.

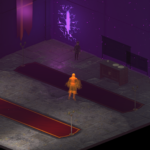
The second aspect of the effect aims to replicate the visual characteristics of a black hole. Initially, I hadn’t made a decision to use ray marching for my final project. During my search for particle effects that resemble black holes, I came across the image on left. The visuals served as a source of inspiration and played a crucial role in guiding the development of this effect.


Upon selecting ray marching as the primary technique for this project, I searched for black hole effects that I could better adapt to this method. While the image on the left has particle effects, it would pose challenges to replicate them using ray marching. Through furhter research I discovered a reference image showcasing the distortion of a plane caused by a black hole. This particular task appeared to be more suitable for ray marching. Moreover, both effects shared the application of a Fresnel effect on the black hole. Still I wanted to enhance the visuals of the blackhole. So I made the decision to recreate certain particles using ray marching, pulling them towards the gravitational the black hole.
Implementation
Bending Effect with Ray Marching
To implement the bending effect, I initially had to determine how to create the structure of the ground. For that there were several potential options. One of my main objectives was to ensure that the ground moved in sync with the camera. Thus creating the illusion of an endless ground. After evaluating different possibilities, I chose to utilize a flat plane as the foundation for the ground.
This approach allowed for greater flexibility in customizing the bending effect since a plane isn’t constrained by preexisting 3-dimensional features. To move the plane beneath the camera, I applied an additional offset. By preserving this offset in camera space instead of converting it to world space, I ensured that the plane maintained a constant distance from the camera. However, not considering the view matrix disrupted the illusion of a dynamic environment. Even when the camera was rotated, the ground plane remained fixed relative to the camera. To address this issue, I utilized the normal vector of the plane used for generating it. By transforming this normal vector relative to the view matrix, I was able to rotate the plane in relation to the camera.
Implementation of the Bending Offset
To incorporate a bending effect, I needed to establish a falloff based on the distance of elements from the camera. The bending effect should have a lesser impact on objects closer to the camera compared to those farther away. For that, I used the z position of each point and calculated the strength of the displacement on the y-axis through the power function. However, using the power function directly resulted in undesired effects. As shown in the left image, the y-axis offset increased too fast, leading to an exaggerated bending effect. To obtain a smoother falloff, I reducedthe influence of the distance to the camera. I accomplished this by multiplying the z position by a small value before passing it into the power function. This adjustment led to a more gradual falloff, as demonstrated in the right image.


Blackhole Effect with Ray Marching
Next, I delve into the implementation of the blackhole effect in more detail. The initial step involved adjusting the blackhole’s position by using the offset calculated for the bending effect. To determine the impact of the blackhole on the ground, I decided to use a smooth step function. This resulted in a more gradual falloff for the deformation applied by the blackhole. I defined a minimum and maximum distance that served as the input range for the smooth function. The smooth step mapped the distance value between the blackhole’s position and the current point. Additionally, I subtracted the radius of the blackhole from this distance to ensure that the influence detection started from the blackhole’s surface.
The blackhole’s impact not only deforms the ground but also mixes the ground texture with red to highlight the blackhole’s influence. To enhance the visual appeal of the blackhole, I implemented two additional enhancements instead of simply having a black sphere.
Applying a Texture to the Blackhole
The first enhancement involved applying a texture to the sphere. However, there are various techniques for applying textures to a procedural object, one of which is to project the texture from the camera onto the scene. The drawback of this approach is that when objects’ positions change on the screen, the texture won’t move with the objects.
Since we approximate the normals of the objects in the world, we can utilize this value to ensure that the texture moves along with the objects.
However, this solution is also imperfect since it performs the approximation of the normals in each rendering step. Consequently, when we approach the blackhole, there may be slight visual noise resulting from this approximation process. To address this visual issue, I also implemented texture movement. I achieved this by adding a small offset to the UV coordinates, which is influenced by the duration since the application started. By introducing this additional texture movement, the visual artifacts resulting from the recalculation of the normals become less noticeable.
Applying Fresnel Effect to the Blackhole
Furthermore, to enhance the visual design of the blackhole, I applied a Fresnel effect to resemble the blackhole depicted in the original images.

To accomplish this, I interpolated the alpha value between the original color and a color defined for the Fresnel effect. By taking the dot product of the approximated normal and the direction, I obtained the Fresnel alpha value. This ensured that the alpha value remained constant for the blackhole, regardless of the camera’s orientation.
Blackhole Particles with Ray Marching
Placing the Particles around the Blackhole
Lastly, I want to discuss how I approached the implementation of the blackhole particles. Similar to the blackhole itself, I created the particles using raymarching and applied a texture and Fresnel effect to them. The particle effect consists of two main components. Firstly, there are particles that spawn around the center point of the sphere. This was inspired by an exercise where we had to generate a procedural circle. To position the particles around the blackhole, I multiplied the degree by the column index, which results in a decreasing angular spacing between particles as the number of columns increased. By introducing a time-related value, the particles were able to rotate around the sphere. Additionally, I applied a minor angular displacement to the particles that were farther away from the blackhole, creating a non-linear positioning effect for the particles.

Pulling the Particles towards the Blackhole
The second aspect of the effect involved adding motion to create the illusion that the blackhole was pulling the particles towards itself. To achieve this, I used two different shaping functions. The first function resembled a sawtooth wave, where the values linearly transitioned from 1 to 0 and then abruptly returned to 1. In my case, this function was suitable for determining the positioning of the particles. Since I wanted to create an endless loop of particles, it made sense to respawn a particle that reached the maximum distance from the blackhole. To achieve this, I multiplied the value obtained from the sawtooth function by the maximum distance. The result of this muliplication is the current distance of the particle from the blackhole. By multiplying this distance by the angular placement of the particle around the blackhole, I could determine the current position of each particle.

Finally, I aimed to address the sudden appearance of particles when they respawned at the maximum distance. This was achieved by introducing an additional shaping function that influenced the particle’s radius. To accomplish this, I utilized a shaping function featured on the Book of Shaders. To use this function, I mapped the current distance of each particle from the blackhole to a range of 0 to 1. By providing this remapped value as input to the function, I was able to generate particles that start small grow bigger and shrink again when they get to close to the blackhole.
Future Improvements
Despite achieving the desired goals for this project, I believe there is still room for improvement and expansion. Firstly, enhancing the scene by adding more objects, such as a small house created through Raymarching, would be beneficial. This would demonstrate the interaction of the effect with more complex shapes. Currently, the project lacks complex lighting, and considering the space-focused setting with the blackhole, incorporating a sun as a directional light source would be appropriate.
Additionally, I have currently put all the effects within a single material. It would be desirable to extract certain components into their own materials. For instance, Icould assign its own material to the skybox, while we could place the blackhole and particles in a separate material. Since the blackhole and particles fuse together, they cannot have individual materials. However, since the ground doesn’t fuse with other objects in the scene, it could have its own material. To achieve this separation, I should calculate the final position of the blackhole outside of the shader and pass it into the different materials. As a result, the impact of the bending effect on the blackhole has to be calculated outside of the shader to determine the final blackhole position.
Another issue with the application is the performance impact when there are numerous particles around the blackhole. To address this, it would make sense to replace the raymarching particles with traditional ones to improve GPU performance. Lastly, there is a small bug where the ground texture stretches extremely when the camera faces it directly. To resolve this issue, I would potentially use the dot product of the camera’s facing direction and the plane normal to influence the scaling of the texture accordingly.