
Overview
Hamlet was a collaborative student project completed by a group of six individuals, including myself, as part of the “Making Games” course at IT University Copenhagen.
We used Unity as the platform for developing the game. The main objective of the “Making Games” course was to encourage students to work together and create various prototypes collaboratively.
We had around three months to create an alpha version of a game of our choice.
Hamlet is based on the story of Shakespeare’s Hamlet. Our aim was to design an adventure where players take the role of Hamlet, exploring different rooms of the castle Kronborg and have to solve puzzles to progress to the next level.
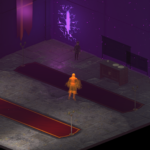
The puzzles in the game revolve around moving objects, such as tables or chairs, in the 3D world to cast shadows in a 2D environment. By positioning these shadows, players can reach the portal and advance to the next level.
As the player progresses, they will encounter various obstacles that increase the difficulty of solving those puzzles. For instance, armored enemies can attack Hamlet in both 3D and 2D environments. Moreover, ghosts of other characters appear throughout the game, providing valuable information or abilities in the 3D environment but acting as enemies in the 2D environment. This can involve deactivating object shadows or manipulating them to hinder the player’s progress.
In summary, Hamlet offers an interesting experience with progressivly harder puzzles that aim to connect the 3D and 2D environments.
My Contribution
During the projects runtime of Hamlet, my primary responsibility revolved around developing the system responsible for generating interactive shadows for the 2D environment.
First Approach
The system responsible for creating interactable shadows in Hamlet proved to be a significant challenge. It went through multiple iterations to cater to the requirements of the design team.
For each wall that should recieve interactable shadows, we strategically positioned light sources perpendicular to those walls. We asssigned a specific lighting layer to each wall, to gurantee that it only received shadows from the designated light source. This approach allowed us to have a functioning 2D environment across multiple walls, regardless of their orientation. Furthermore, objects in the 3D environment could rotate freely and still cast appropriate shadows in the 2D environment.
Since the shadows in the 2D environment needed to be interactive, we had to find a way to generate collisions for the projected shadows. To achieve this, we created a duplicate of the projected object and flattened it onto a 2D plane.
The resulting mesh could be used for the collisions in the 2D environment when moved the wall this shadow is cast onto.


However, as this was an early iteration, it did not handle the vertices within the projected 2D plane effectively. Consequently, high-polygon objects that should cast shadows could result in significant performance issues.
Additionally, this system heavily relied on the engine’s shadow-casting capabilities. This limited our flexibility in terms of adding more details or achieving a stylized appearance for the shadows. Adjusting the system to accommodate these additional visual nuances proved challenging due to the constraints imposed by the engine.
Second Approach
After encountering the limitations of the initial approach, our team decided to explore an alternative solution.
This new solution involved the creation of a secondary camera dedicated to rendering objects on a specific layer. In the first step, we create a clone of every projected object. This clone was moved to the layer rendered by the secondary camera. The camera was strategically positioned perpendicular to the wall where the object was intended to be projected. This ensures that the relationship between the real object and wall would be captured appropriatly. The view of the camrea view was then rendered onto a RenderTexture. By extracting the pixel data from this RenderTexture, a Texture2D object was constructed, which could be used as the image for a new Sprite.
To handle the creation of multiple object projections, it was crucial to clear the color channel of the camera after generating each sprite. Otherwise, it would result in artifacts from previous objects persisting in later sprites. Then we could assign the dynamically generated sprite to the SpriteRenderer of the 2D projection object. A prefab was used for the projection object, so that the color of the SpriteRenderer could be uniformly adjusted to apply a consistent tint and opacity to all projected sprites. Without these adjustments, the projected objects would retain the coloring of their 3D counterparts. To optimize the performance, we disabled both the camera and duplicated object after the gernation of the spite.

This change allowed us to utilize custom sprites for certain projections, such as the player character, while still relying on the 3D counterparts to generate appropriate shadows for other objects. However, there were some drawbacks to this approach. Since we utilized a single camera for rendering the objects and disabled it after the initial rendering process, we could no longer rotate the objects freely. Doing so would cause the sprite to lose alignment with its 3D conterpart. To overcome this limitation, one possible solution would be to activate the camera or use separate cameras for each individual shadow when an object starts rotating. To ensure a proper relationship between the 3D object and projected shadow, the corresponding sprite needs to be updated.
Learnings
Working on this project was my first experience collaborating with a larger international team. Therefore it was a valuable expierence that pointed out the significance of concise communication between designers and programmers. Furthermore, it highlighted the importance of maintaining highly adaptable and modular code. This is necesary to accommodate evolving design visions, allowing for testing and integration of new concepts. Lastly, I also acquired valuable knowledge in the realm of lighting and rendering within Unity.